Connectprof Product list
"Click on the Product List from your admin panel. With ConnectProf, you can filter your product list, extract product outputs, perform bulk product updates, and many more operations like product matching."
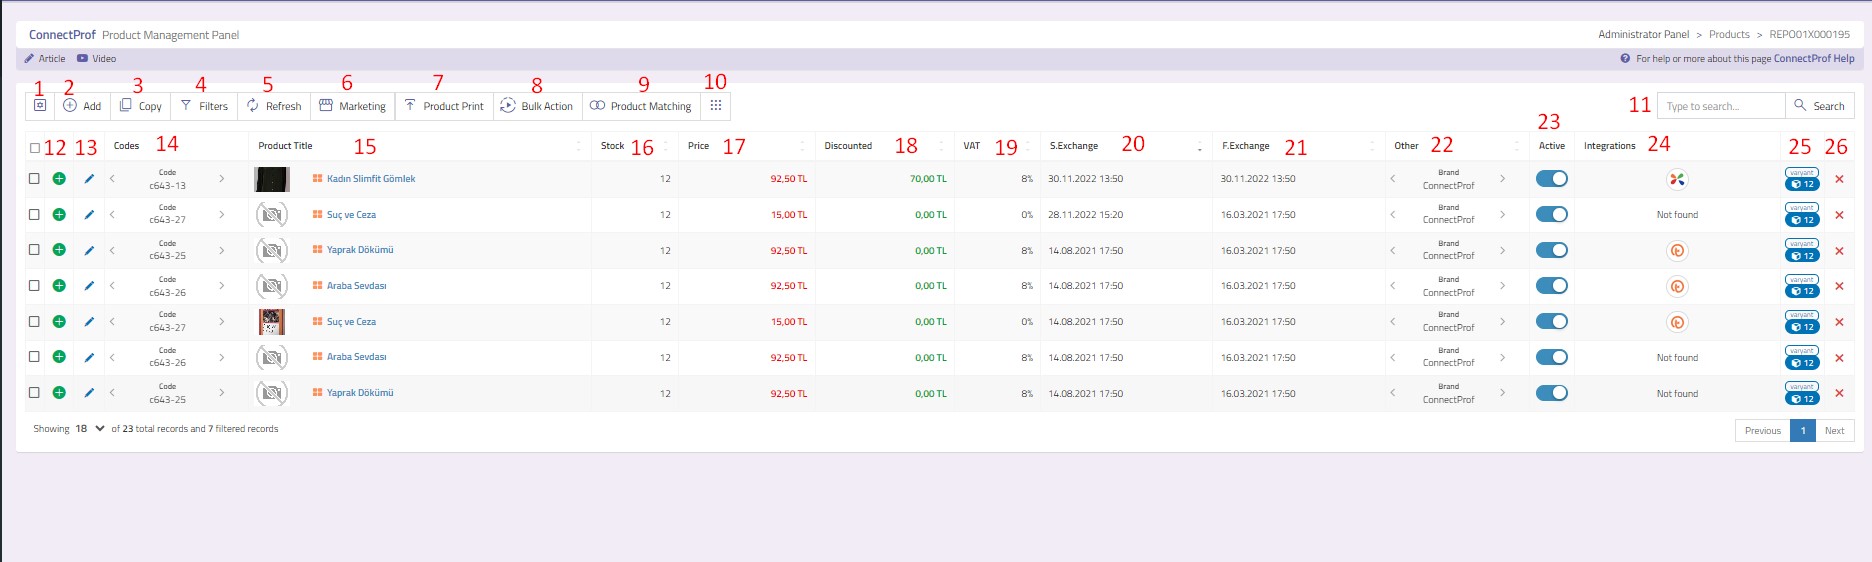
Product List Page Button Functions
When you click on the Product List from your admin panel, the product list page will open.
From this page, you can perform various operations such as filtering, updating, and exporting.
1. Settings Button: With this button, you can select the fields you want to display on the product page and deselect the fields you don't want to display.
2. Add: Used to manually create products apart from those coming from integration. Click for detailed information about adding products.
3. Copy: Creates a copy of the selected product. Click for detailed information about copying products.
4. Filters: Allows you to filter your product list. Click here to learn more about filtering the product list.
5. Refresh: Refreshes the product list page.
6. Product Output: You can export the product list in different formats. Click here for detailed information on creating product outputs.
7. Bulk Product Update: Allows you to update your selected products from the Marketplace. Click here for detailed information on Bulk Product Update.
8. Product Matching: If the products already exist on the marketplace, you can match the product information in the ConnectProf panel to prevent conflicts.
9. Menu: Allows quick navigation to other pages within the product list, such as Product Catalog, Orders, Catalog Settings, Import, Export, Special Output List, My Accounts, and Support Requests.
Each page has separate articles.
Click here to access the Product Catalog article.
Click here to access the Orders article.
Click here to access the Catalog Settings article.
Click here to access the Import article.
Click here to access the Export article.
Click here to access the Special Output List article.
Click here to access the My Accounts article.
Click here to access the Support Requests article.
10. Search: Allows you to easily find the desired product in the product list using product information.
11. (+) Plus Button: Opens a new product detail window in the new structure. Click here for detailed information about product details.
12. Edit Icon: Opens the editing window of the product in the old structure.
13. Codes: You can view product code, stock code, supplier code, barcode, and group code information without entering the product details by using the arrows in the Codes section.
14. Product Title: Displays the title information of the product. The title information includes a magnifying glass and a menu button.
- Magnifying Glass: With the magnifying glass button under the title, you can preview the product on the site.
- Menu: When hovered over the menu under the title, you can see which integration the product came with on the ConnectProf panel. Clicking it will redirect you to the import page.
15. Stock: Displays the stock quantity of the product.
16. Market: The market price of the product.
17. Discounted Price: The discounted price of the product.
18. VAT: VAT information of the product.
19. Stock Change: Displays the date and time of the last stock change in the product.
20. Price Change: Displays the date and time of the last price change in the product.
21. Others: Clicking on the arrows in the Others section allows you to view the brand and model information of the product without going to the product details.
22. Active: With the active button, you can manage the active/passive status of the product. When the active field is blue, the product will be ready for sale. When the active field is gray, the product will be inactive and not available for sale.
NOTE: When the active status is manually changed for products coming via API or XML, it will revert back to the previous state with an update. Therefore, you can manage the active status of products coming via integration on the site. You can use this setting for manual product additions.
23. Integrations: Shows which integrations the product will be sent to. If the category is not mapped or if "Mapped Categories" is not selected in Export > General Settings, integration information will not be visible in this area.
24. Variant: Indicates how many variants are available for the product.
25. Delete: Click to delete the product.
