Etsy Integration Marketplace
"Etsy Integration Marketplace refers to a commerce model where various sellers can present their own products or services under the same roof and usually conduct transactions through online platforms. It hosts a large virtual shopping demand with millions of daily customer visits and clicks.
Marketplaces allow you to reach a wider audience and make sales of your products on your e-commerce site. This way, you can increase brand awareness, gain loyal customers, and drive traffic to your e-commerce site.
You can facilitate the transfer of your products to various marketplaces by pulling them into ConnectProf using API or XML.
ConnectProf is an integration platform that helps e-commerce businesses manage and synchronize data for Beymen stores. With Beymen integration, businesses can automatically synchronize store inventories and product information through ConnectProf. This allows businesses to keep their stock up to date and provide customers with accurate and current information.
Orders from Etsy can be easily managed through ConnectProf. Orders are automatically synchronized and quickly displayed to businesses, making processes more efficient.
ConnectProf API services enable your business to present its products and services across different platforms and websites. This allows your customer base to reach wider and different platforms.
If you want to set up Etsy integration with ConnectProf, there are certain steps you need to follow.
Firstly, you need to have an Etsy Seller Account.
To create a seller account, click here.
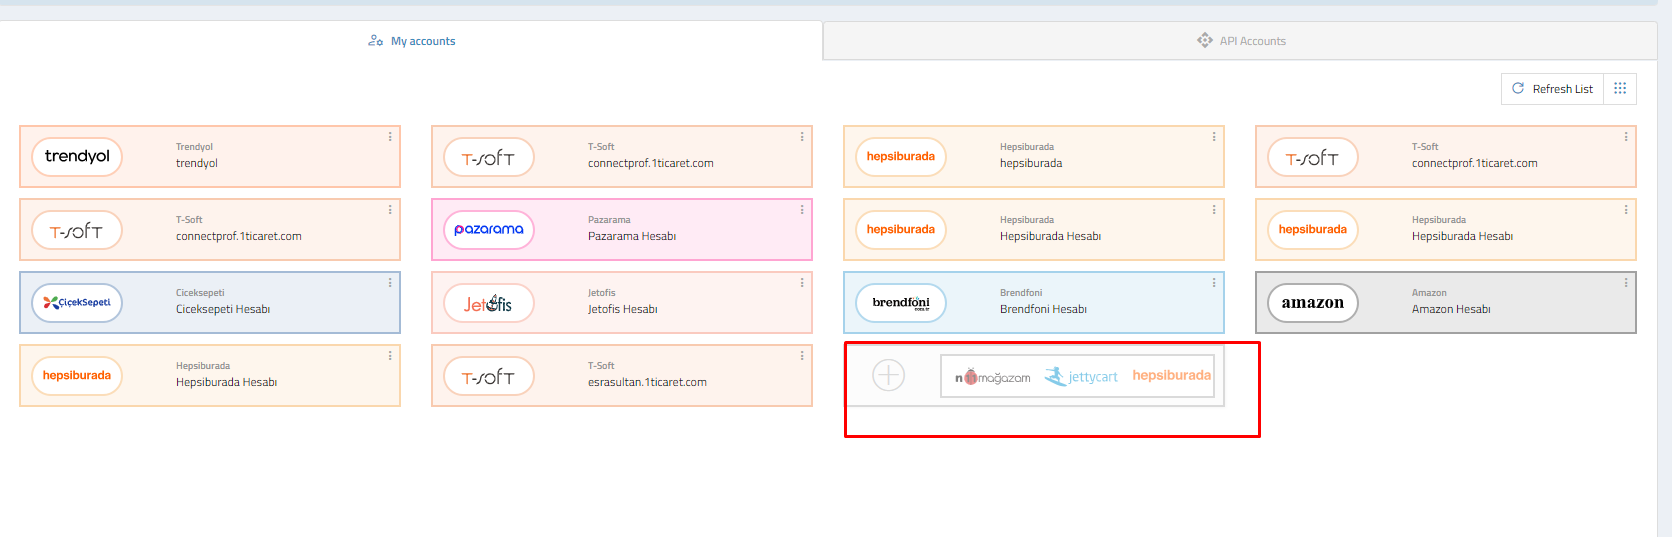
1. Account Connections:
To be able to transfer your ConnectProf products to Etsy and actively make sales, you need to establish an account connection first.
Click on the "My Accounts" page to make an account connection.
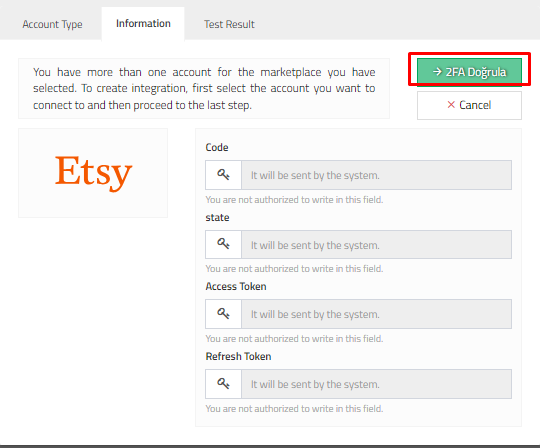
Click on the "Add New Account (+)" button, select the account type as "Etsy," and click "Continue."
Enter your Etsy 2FA information in the information field and click "Continue."
It will redirect to the test result.
The test result checks the accuracy of the marketplace type and the API information you have added. If your account information is incorrect, it will give you a warning.
When the installation is successful, you need to specify an account name in this field.
The added name is necessary to distinguish when multiple integration setups are done. It has no other relationship with other fields.
If the API connection test is successful, you can connect your Etsy account to ConnectProf by clicking the "Add to API List" button.

2. Account Association:
After Etsy 2FA verification, it is necessary to associate Wish with ConnectProf integration.
You can perform the association process from the Category List > Field Management > Account Association page in your admin panel.
Select your added account from the Etsy field on the opened page and click the "Save Changes" button.
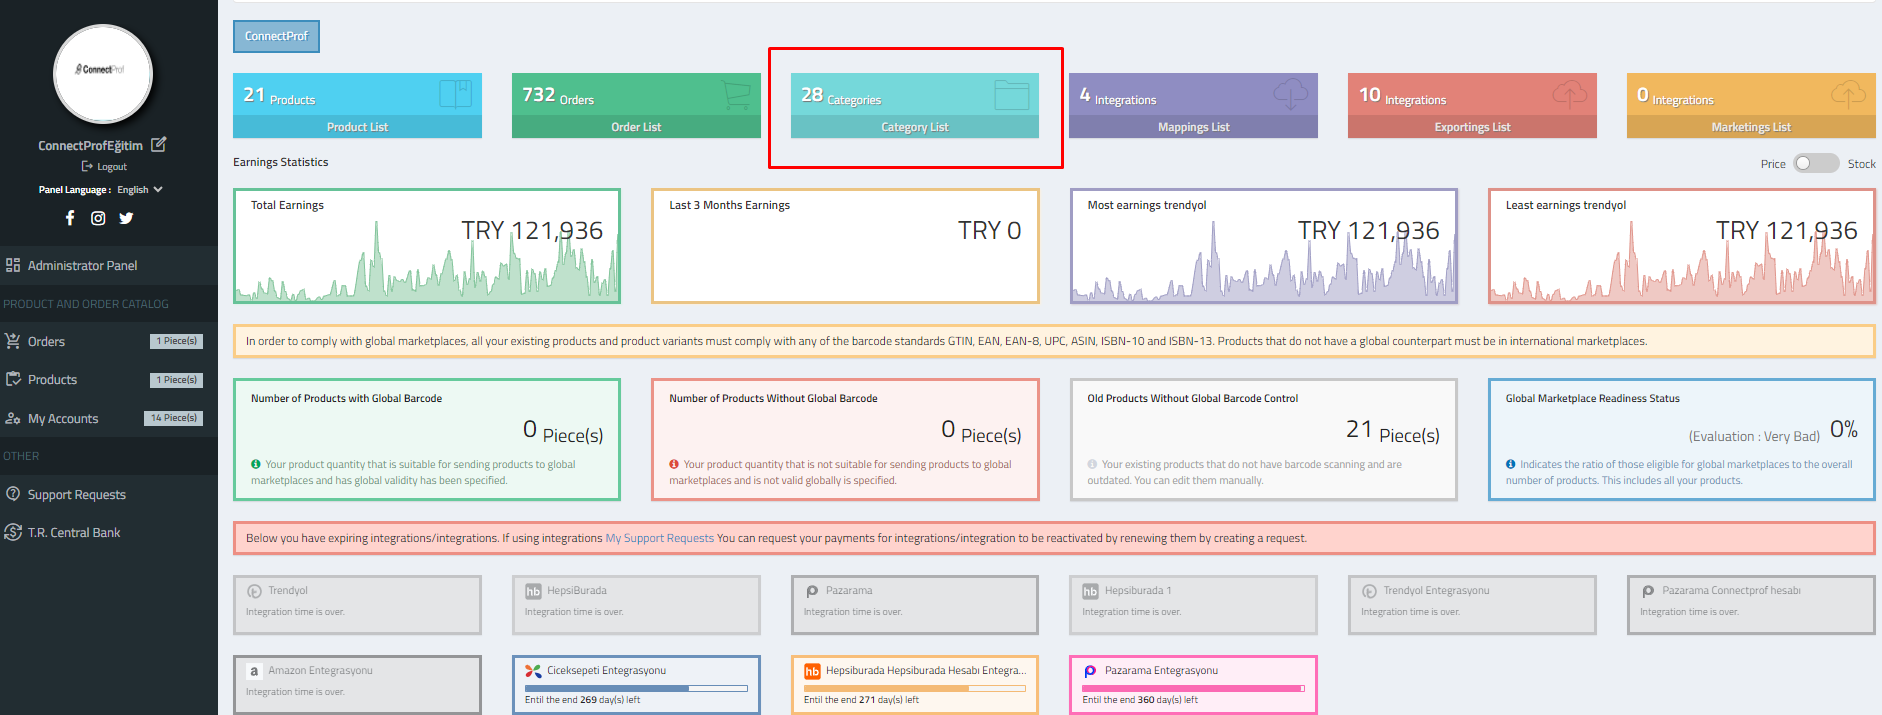

3. Category Mapping:
After completing the account connections, category mapping must be done.
You can choose from which category in ConnectProf you want your products to be listed on Etsy.
NOTE: Products with missing or incorrect information will result in errors on Etsy. Therefore, when performing Category Mapping, make sure to fill in all mandatory fields.
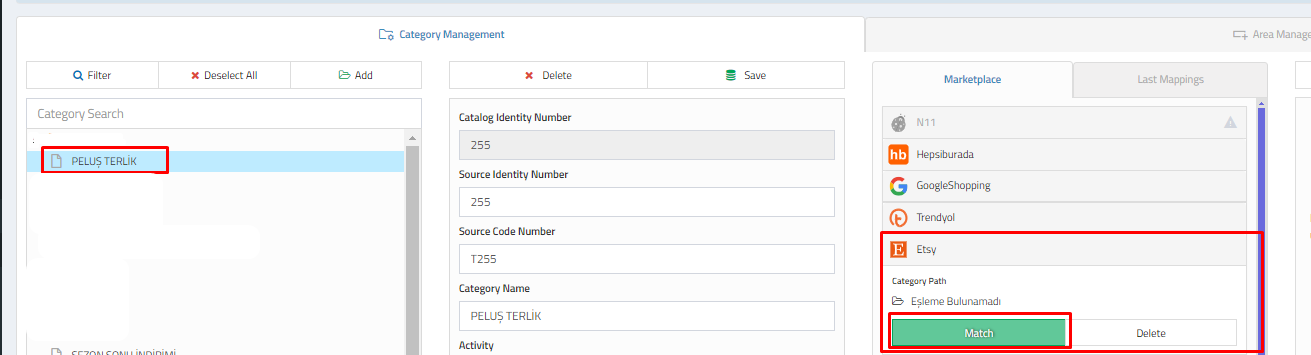
For category mapping, go to the admin panel homepage Category List > Category Management > Category List and select the category you want to map.
NOTE: When selecting categories, the main category should not be selected. The system will not allow mapping to the main category. Therefore, when performing category mapping, choose from the bottommost categories.
After making your selection, click "Match" by selecting "Etsy" from the "Mappings" field.
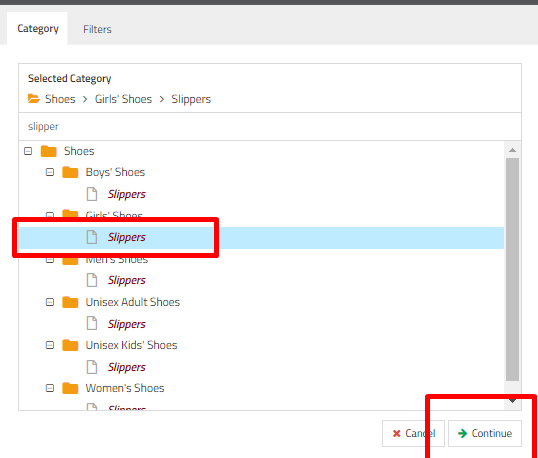
In the opened window, you can search for the category you want to map by typing the category name in the search section or select it among the categories and match it by selecting the last breakdown.
After the matching process, click the "Continue" button.
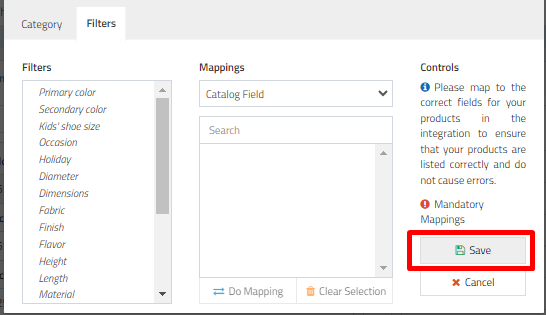
A pop-up will appear for "Filters" selection.
NOTE: Fields marked with an exclamation mark are mandatory filter information. To transfer your products, you must send filter information. If mandatory filter addition is not made, your products will result in an error, and the transfer will not be made.
NOTE: If your filter fields are empty and you want to add filters when performing category mapping, you can review the articles "Add Ready Filter to Category, Add Special Filter to Category, Copy Filter from Another Category to Category."
After adding your information, click the "Continue" button.
In the Filter submission fields, you can send one of three different matching options. The options for matching are Catalog Area, Filter Area, and Fixed Values.
Catalog Area: Existing information on your site. If your site information is compatible with the values to be matched, the catalog area should be selected.
For example, if your Color information is type 1 or type 2 on your site, you can select the area where your color information is located by selecting "Catalog Area" from the "Mappings" area.
Filter Area: If your e-commerce site has a filter area, it will come as it is. If there is no filter structure on your site, it will come empty.
NOTE: If your filter fields do not come automatically, you can open a support request related to the issue.
Fixed Values: Standard values provided by the marketplace. Fixed values cannot be changed or added on the panel. If additional values are desired, communication should be made with the marketplace you are using.
NOTE: If there is a field in your product information with appropriate filter information, you can select the corresponding option from the catalog area.
To get detailed information about Filter Mapping, you can check the "Filter Mapping" article.
After adding your information, click "Continue."
Variant mapping will be opened. In this window, select the variant type you want to map from the variant type field.
For example, select "Color" or "Size" and select from the "Matching field" in the features field where your color or size information is located on your site.
Click "Make One-to-One Value Matching" to match the values on the marketplace with the values on your site.
You can manually match by selecting or automatically define by clicking "Auto Match."
Your category will be matched, and it will appear in the mappings field.
Make sure your product information is correct before transferring products.
You can check your categories by clicking the "Edit" button in the "Mappings" field.
You can enable product transfer by adding specific limits to your category's products from the Stock and Price Limitation area."
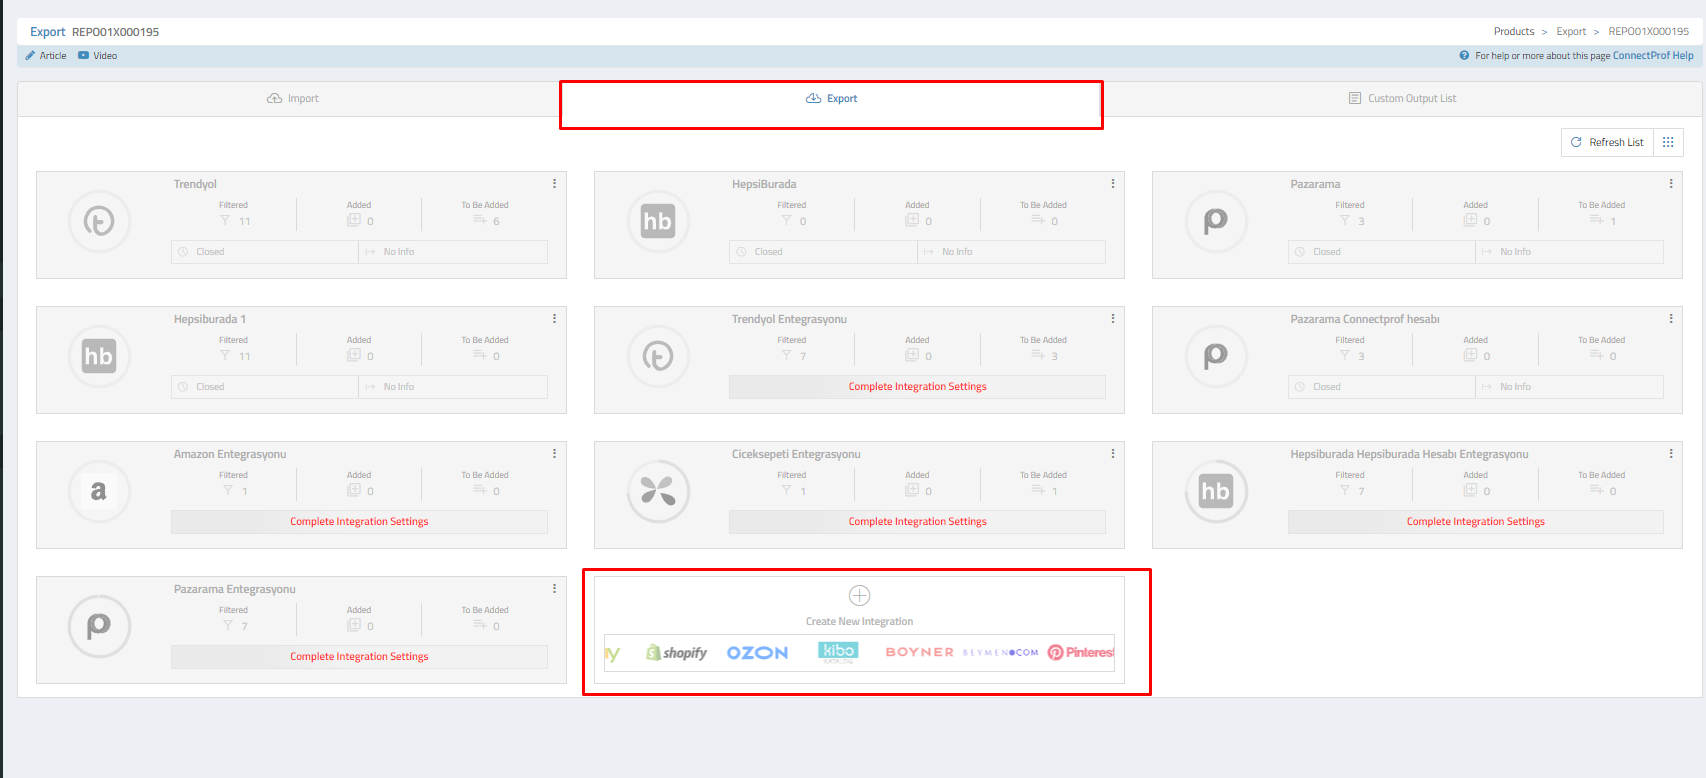
4. Export Integration Installation:
You can transfer your products coming with API or XML from Connectprof to many marketplaces with the desired information.
You can do the export process from the "Export List" in your admin panel.
For export, integration setup must first be done.
Click the "Create New Integration" button on the opened page for integration setup.
Etsy must be selected from the opened Marketplace Selection window.
In the Account Selection field,
When the "Continue" button is clicked, it will redirect to the integration creation window.
From the directed window, click the "Create Integration" button to set up the export integration.
After the installation, the settings of the export integration need to be added in the following steps.
With export integration, you can manage your general settings, options, commissions, exchange rates, special conditions, exclusions, newly added ones, reports, and error groups."